The Complete Injection Molding Process: From Design to Mass Production
Injection molding is the most efficient and cost-effective manufacturing method for producing high-volume plastic parts—critical for brands launching smart home devices, pet products, security equipment, and other electronics in the US and EU markets. Whether you’re partnering with an OEM/ODM factory for custom production or optimizing your supply chain, understanding the full injection molding process helps you control quality, reduce costs, and speed up time-to-market.
1. Pre-Production: Design, Material Selection & Mold Preparation
The success of injection molding starts long before the machine starts running. Pre-production lays the foundation for high-quality, consistent parts that meet US and EU standards (FCC, CE, RoHS) and your brand’s specifications. This phase includes three key steps:
1.1 Product & Mold Design
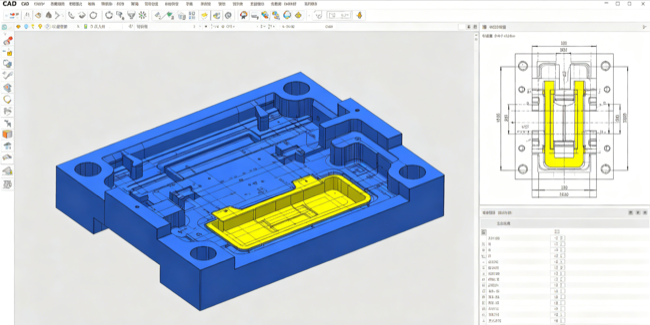
First, engineers create a detailed 3D design of the plastic part using CAD (Computer-Aided Design) software. This design must account for critical factors like part geometry, wall thickness (uniformity prevents warping), draft angles (for easy mold release), and gate locations (where molten plastic enters the mold). For custom OEM projects, this design is based on your brand’s unique requirements; for ODM projects, it uses the factory’s pre-approved, optimized designs.
Once the part design is finalized, the mold (also called a tool) is designed. Molds are typically made from high-grade steel or aluminum, with precision machining to ensure the final part matches the CAD design exactly. The mold’s complexity depends on the part’s features—simple parts may use a single-cavity mold, while complex parts (like smart home device casings) use multi-cavity molds for higher production volumes.
1.2 Material Selection
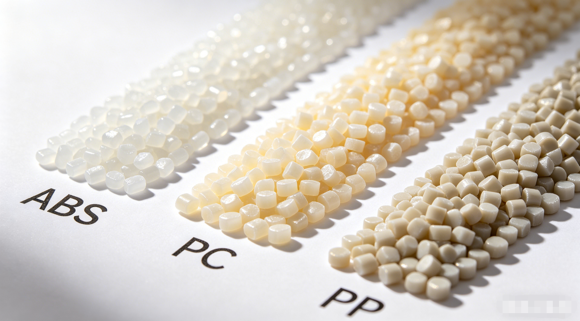
Choosing the right plastic material is critical for meeting US/EU safety standards and product performance. Common materials used in injection molding for global brands include:
- ABS: Durable, impact-resistant, and ideal for smart home device casings, pet product frames, and security camera housings.
- PC (Polycarbonate): Transparent, heat-resistant, and used for parts like pet feeder windows or security camera lenses (meets FDA standards for food contact).
- PP (Polypropylene): Lightweight, chemical-resistant, and suitable for waterproof parts (e.g., pet water fountains, outdoor security sensors).
- TPU: Flexible, waterproof, and used for soft-touch components (e.g., pet toy grips, smart home remote covers).
Compliance Note: All materials are selected to comply with RoHS (EU) and FDA (US) standards, ensuring they are non-toxic, eco-friendly, and safe for end-users in global markets.
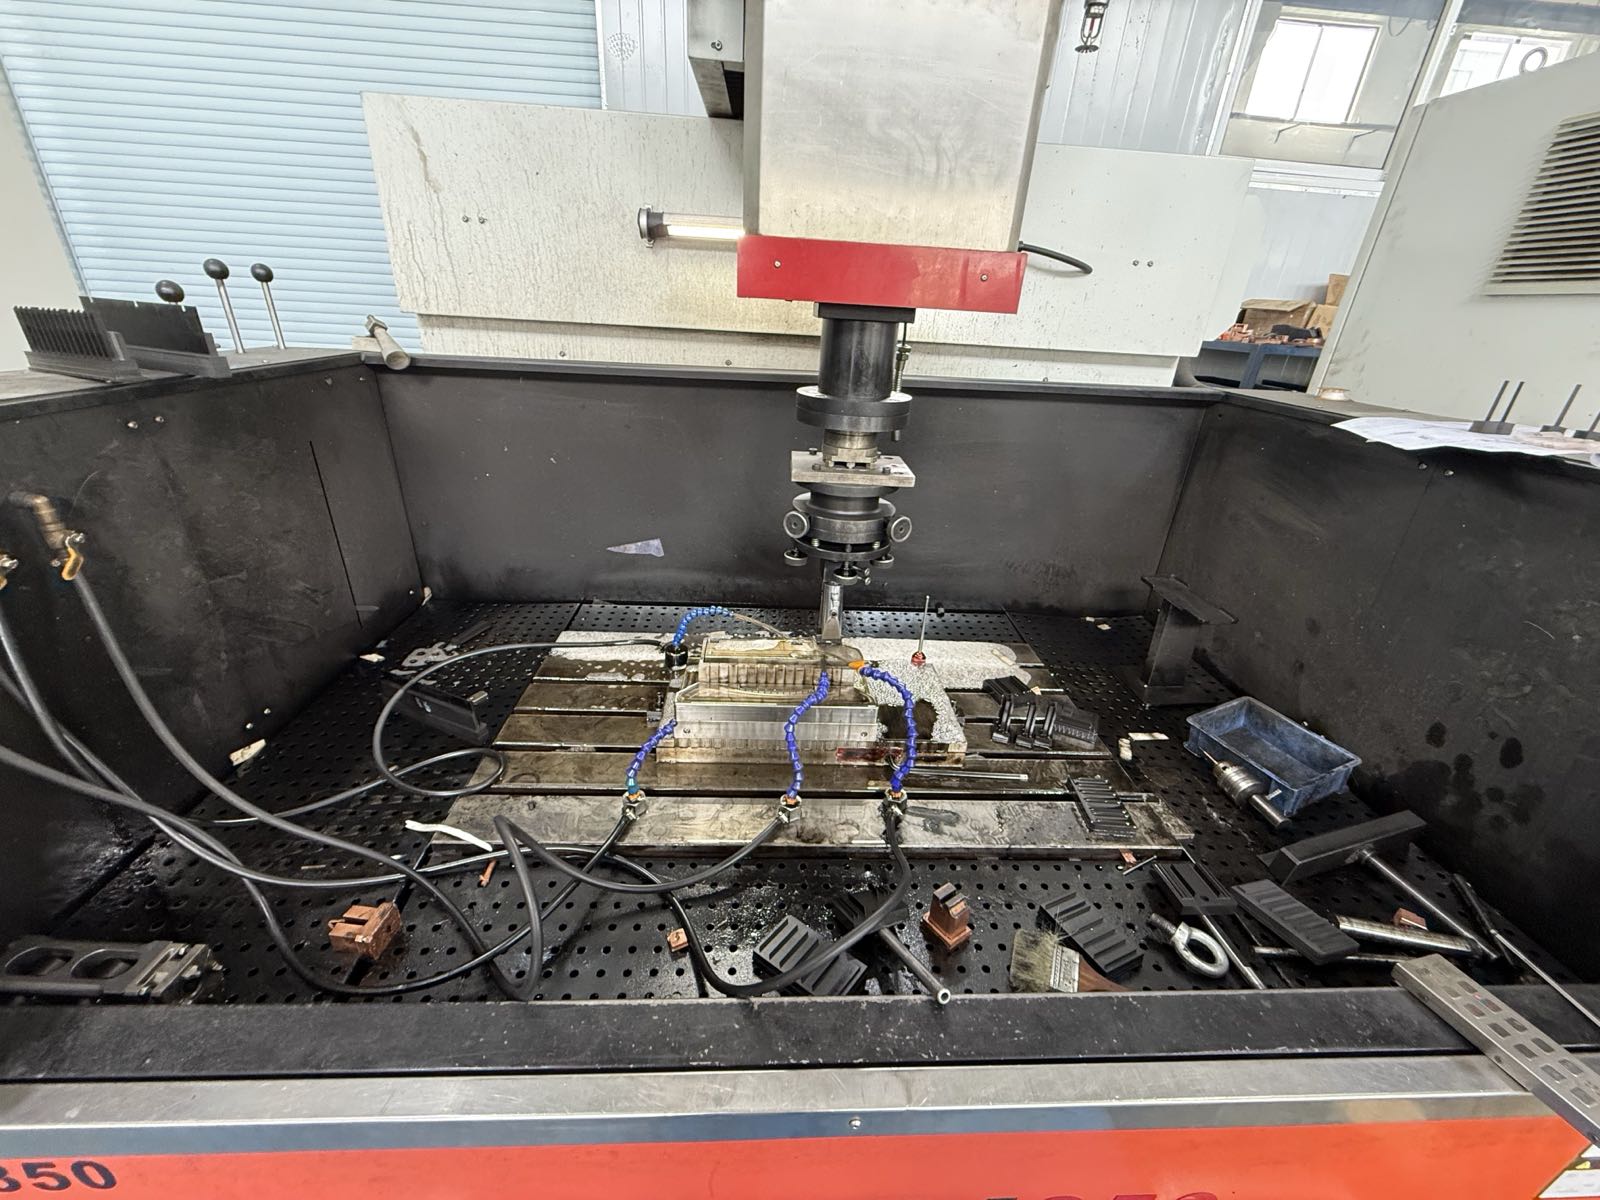
1.3 Mold Testing & Validation
Before mass production, the mold is installed on the injection molding machine for a test run (called a “trial shot”). This step identifies issues like mold misalignment, uneven plastic flow, or part defects (e.g., sink marks, flash). Engineers adjust the mold and process parameters (temperature, pressure) until the trial parts meet all quality standards. For US/EU-bound products, trial parts are also tested for compliance with regional safety and performance requirements.
2. Production: The Injection Molding Cycle
Once pre-production is complete, the injection molding machine runs in a continuous, automated cycle to produce high-volume parts. Each cycle takes 10–60 seconds (depending on part size and complexity) and consists of 5 key stages:
2.1 Clamping
The two halves of the mold are clamped together tightly by the machine’s clamping unit. The clamping force must be strong enough to withstand the pressure of molten plastic being injected into the mold—typically 10–200 tons of force, depending on the mold size and part complexity. This ensures no plastic leaks (flash) during injection.
2.2 Injection
Plastic pellets are fed into the injection unit, where they are heated to a molten state (150–300°C, depending on the material). A screw pushes the molten plastic through a nozzle into the mold cavity at high pressure (1000–5000 psi). The plastic fills the cavity, conforming to every detail of the mold’s design—from small logos to complex internal structures.
2.3 Packing & Holding
After the mold cavity is filled, the machine maintains pressure (holding pressure) to ensure the mold is fully packed with plastic. This prevents shrinkage or sink marks in the final part, as molten plastic cools and contracts. The holding time varies based on part thickness—thicker parts require longer holding times to ensure full density.
2.4 Cooling
Cooling channels inside the mold circulate water or air to cool the molten plastic, solidifying it into the shape of the mold cavity. Cooling time is critical: too short, and the part may warp or stick to the mold; too long, and production efficiency drops. For most parts, cooling takes 5–30 seconds, and engineers optimize this time to balance quality and speed.
2.5 Ejection
Once the plastic is fully solidified, the mold opens, and ejector pins push the finished part out of the cavity. The part is then collected (either manually or by an automated conveyor system) and inspected for defects. Any defective parts are removed, and the mold closes to start the next cycle—creating a continuous production loop.
3. Post-Production: Finishing, Quality Control & Packaging
After production, parts go through post-processing to meet your brand’s specifications and US/EU market requirements. This phase ensures consistency, compliance, and readiness for shipping.
3.1 Finishing
Finishing steps depend on the part’s intended use and your brand’s aesthetic requirements. Common finishing processes include:
- Trimming: Removing excess plastic (flash) from the part using automated trimmers or hand tools.
- Polishing: Creating a smooth, glossy surface (ideal for smart home devices or premium pet products).
- Painting/Printing: Applying brand logos, colors, or text (using eco-friendly, RoHS-compliant paints).
- Assembly: Combining injection-molded parts with other components (e.g., electronics, hardware) for finished products.
3.2 Quality Control (QC)
Quality Assurance: Strict QC is non-negotiable for exporting to the US and EU markets. Our factory implements a comprehensive 3-step QC process to ensure every part meets your standards.
- In-Process Inspection: Checking parts at every stage of production (e.g., after ejection, after finishing) to catch defects early.
- Random Sampling: Testing a percentage of finished parts for dimensional accuracy, material compliance, and performance (e.g., waterproofing, impact resistance).
- Final Inspection: Inspecting all parts before packaging to ensure they meet your brand’s standards and US/EU compliance (CE, FCC, RoHS).
All QC reports are documented and provided to clients, ensuring transparency and trust for global brands.
3.3 Packaging & Shipping Preparation
Finished parts are packaged in eco-friendly, US/EU-compliant packaging (recyclable materials for EU markets) to prevent damage during shipping. Packaging is labeled with English information (part name, quantity, compliance certifications) and customized with your brand’s logo if needed. For bulk orders, parts are packed in cartons or pallets, ready for shipping to US and European warehouses.
4. Key Considerations for US & EU Brands
When working with an injection molding factory for US/EU markets, keep these factors in mind to ensure success:
- Compliance: Ensure all materials and processes meet CE, FCC, RoHS, and FDA standards (critical for market access).
- Mold Quality: Invest in high-grade molds (steel molds last longer for high-volume production) to reduce maintenance and defect rates.
- Lead Time: Work with a factory that can deliver mold development and production within your timeline (typically 4–6 weeks for molds, 2–4 weeks for mass production).
- Communication: Choose a factory with an English-speaking team to avoid miscommunication about design, specifications, and compliance.
Conclusion
The injection molding process is a precise, automated system that delivers high-quality, consistent plastic parts for global brands. From pre-production design and material selection to post-production finishing and QC, every step plays a critical role in ensuring your products meet US/EU standards, your brand’s requirements, and end-user expectations.
Whether you’re launching custom smart home devices, pet products, or security equipment, our team ensures fast, compliant, and cost-effective production for the US and EU markets.